Showing posts with label NVision. Show all posts

NVision Specialized Training Assists Navy's Reverse Engineering

Customized, on-site training provided by NVision, Inc. is helping a Naval Air Station (NAS) improve its reverse engineering process.

After experiencing significant frustration and sub-standard scanning results, the NAS contacted NVision, which regularly works with every branch of the U.S. military and specializes in providing scanning solutions and customized, on-site training in the use of laser scanners for reverse engineering. An NVision engineer traveled to the base and spent four days extensively training its personnel on site in the use of laser scanning equipment and software. "Our on-site training with actual parts is one of the reasons why NVision's work with the military continues to grow," says Colin Ellis, Engineering Manager at NVision. "NVision is unique in that we provide full turnkey solutions from start to finish including training instead of having clients purchase separate hardware, software, and training from different places, which happened in this case."

Engineers and machinists at the base regularly need to reverse engineer complex replacement parts for naval aircraft in order to keep the planes and helicopters in peak flying condition. Although this NAS purchased a 3D laser scanner for reverse engineering from another vendor a few years ago, the vendor's lack of a thorough training program limited the ability of its personnel to reverse engineer parts in military aircraft. Sadly, the original training was on parts completely unrelated to those used at an NAS facility and with software not suitable for the station's needs.

The NVision engineer initially had some difficulty using the base's scanning equipment due to its inherent limitations. These issues included a very small laser strip width, tiny stand-off distance, and limited depth of field. Thankfully he was he able to resolve all of the NAS's issues and concerns by providing the facility with two new high-speed portable workstation computers and extensive training on XOR software using the station's own parts and real-world scenarios.

"Fortunately, with NVision's superior level of on-site training and the XOR software, we were able to bring the NAS completely up to speed on reverse engineering their complex parts," says Ellis. "The base now plans to replace their current rudimentary and slow scanner with an NVision high-accuracy and wide-stripe scanner in order to speed up their reverse engineering process even more."

For more information, contact NVision, Inc., 440 Wrangler Dr, Suite 200, Coppell, TX 75019. Ph: 972.393.8000, Fax: 972.393.8002. E-mail: sales@nvision3d.com. Visit NVision's Web site at www.nvision3d.com.

About NVision
NVision, Inc. (www.nvision3d.com) was established in 1990 with one goal in mind: to provide customers with the highest accuracy non-contact optical measurement systems and services for Reverse Engineering and Inspection. Focusing our expertise on the aerospace, power generation, and oil/gas industries, NVision provides both contract scanning services and systems sales to companies throughout North America. Our elite team of engineers provides customers with an unmatchable level of experience and is able to advise and assist with the most difficult engineering challenges.

NVision's clients include industry leaders such as Alstom, Boeing, GE, Lockheed Martin, Lear, NASA, Porsche, Raytheon, Siemens, Toyota, and every branch of the U.S. military.
NVision Scanner Helps Get Aircraft Accessories to Fit Right the First Time

NVision’s HandHeld laser scanner is being used by Lockheed Martin [NYSE: LMT] engineers at its Missiles and Fire Control business to assure the fit of accessories to aircraft exteriors and interiors is positioned perfectly the first time.

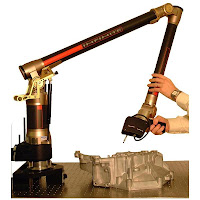
The NVision Handheld scanner is a powerful portable scanning device which is capable of capturing 3D geometry. The NVision HandHeld is attached to a mechanical arm that moves about the object, freeing the user to capture data rapidly and with a high degree of resolution.

NVision’s HandHeld scanner has helped Lockheed Martin engineers accurately measure millions of points by simply moving it over an aircraft’s surface, enabling perfect fits on first prototype iterations.

“The Handheld laser scanner is a perfect fit for this application because its ability to move freely around a part makes it possible to reverse engineer virtually any size or shape of part,” said Steve Kersen, President of NVision. The scanner is attached to a mechanical arm which moves about the object, freeing the user to capture data rapidly and with a high degree of resolution. An optional tripod provides complete portability in the field. Intuitive software allows full model editing, polygon reduction, and data output to all standard 3D packages.

“An important advantage of laser scanning is that it provides accurate measurements of parts ranging in scale from the entire exterior of a commercial helicopter down to very small components,” said Stephen Rocca, manager of Mechanical Laboratories at Lockheed Martin Missiles and Fire Control in Orlando, Fla. “Getting the fit correct the first time provides significant time and cost savings. Laser scanning has also improved the accuracy of the fluid dynamic models that we use to predict the effect of the accessories on flight performance, providing a safety advantage.”

In building aircraft accessories, it’s critical to determine the exact geometry of the aircraft which normally cannot be obtained from computer aided design (CAD) models because the exact configuration varies from aircraft to aircraft. For example, aircraft interiors are populated with cables and hydraulic lines that often do not show up or show up in a different position in the CAD model. In the past, conventional measuring instruments were used to physically measure the aircraft. For example, technicians would measure the body exterior, rotor, skids, windows and doors of a commercial helicopter.

This was a very tedious process because an individual measurement had to be taken for each point. There was never enough time to take enough points to fully define the geometry so technicians frequently had to take a best guess as to the exact surface contours. The result was that the prototype often had to be reworked to get it to fit the exterior. The inherent inaccuracies of the manual measurement methods used in the past meant that three or four prototype iterations were typically required to obtain a good match to the aircraft.

After NVision demonstrated the ability to obtain high levels of accuracy in laser scanning, Lockheed Martin purchased an NVision Handheld scanner for a production site in Alabama, and later, a second scanner, for its Orlando, Fla., manufacturing facility.

About NVision
NVision, Inc. (www.nvision3d.com) was established in 1990 with one goal in mind: to provide customers with the highest accuracy non-contact optical measurement systems and services for Reverse Engineering and Inspection. Focusing our expertise on the aerospace, power generation, and oil/gas industries, NVision provides both contract scanning services and systems sales to companies throughout North America. Our elite team of engineers provides customers with an unmatchable level of experience and is able to advise and assist with the most difficult engineering challenges.

NVision’s clients include industry leaders such as Alstom, Boeing, GE, Lockheed Martin, Lear, NASA, Porsche, Raytheon, Siemens, Toyota, and every branch of the U.S. military.

NVision’s Scanning Saves Invensys 60 hours in Mechanical Upgrade to Steam Turbine

Invensys Operations Management (IOM) saved 60 hours, or about 5% in man-hours, in a mechanical upgrade to a steam turbine by using NVision’s Engineering Service Division to capture precise measurements of valves and other hardware. IOM usually has to spend considerable time field machining upgrade components prior to installation because accurate drawings are not always available. “NVision’s laser scanning provides highly accurate measurements, reducing engineering time and eliminating the need for field machining,” said Michael Montesinos, Senior Applications Engineer for the Turbo Machinery Group of IOM, Webster, Texas.

IOM, a division of Invensys, is a leading provider of automation and information technology, systems, software solutions, services and consulting to the global manufacturing and infrastructure industries. Its Turbo Machinery Group provides electromechanical hydraulic upgrades to electrical power generation, oil refining, nuclear, pulp and paper, and chemical plants. Drawings are not usually available for these projects either because they have been lost over time or because the OEM that originally installed the equipment closely guards detailed drawings in an attempt to improve their position as a service provider and OEM.

In the past, designers and engineers had to spend extra time in designing the new equipment to account for dimensional uncertainties. After the equipment was built and delivered, measurements had to be taken to determine what adjustments needed to be made to the equipment. The equipment was sent to a local machine shop to make the adjustments. It’s important to note that this process needed to be carried out during a turnaround when the plant was shut down for maintenance and improvements. Extending a plant outage beyond the planned timeline typically carries a cost of several hundred thousand dollars in lost generating revenue.

Click Here to Read Entire Article

NVision Helps Soft Air Produce Handgun Replica Three Months Faster

Soft Air USA used NVision’s laser scanning services to save three months in getting an Airsoft replica of FN Herstal’s FNP9-17 handgun to market. This is a significant time-savings over Soft Air’s previous process, which involved making silicon molds of real guns and using the molds to create injection molds that in turn make the replica Airsoft guns. Laser scanning saves time because it eliminates the need for manual touchup of the silicon mold and the resulting CAD model of the real gun can then be electronically sent to manufacturers in Asia.

“Airsoft” refers to a specific type of replica gun that shoots lightweight plastic pellets at a muzzle velocity of less than 600 foot per second. The combination of the light projectile and relatively low muzzle velocity means that Airsoft guns are generally considered safe when used with safety equipment such as protective eyeware. Soft Air USA®, Inc is a subsidiary of Cybergun S.A., the world’s leading manufacturer of replica Airsoft guns. Soft Air USA® has licenses from gun manufacturers such as Smith & Wesson®, Colt®, Sig Sauer®, IMI (Uzi®), Mauser, Thompson® and Kalishnikov.

The FNP-9 is a polymer-framed pistol that weights 25 ounces and has a 16+1 magazine capacity. “The FNP-9 handgun has never been done as an Airsoft gun in the past,” said John Steele, President of Soft Air USA. “We wanted to make as accurate a reproduction of the gun as is humanly possible.” In the past, Soft Air has reproduced guns by first making a silicon mold of the actual gun. One problem with this approach was that the gun used as the master was destroyed in the process. Another problem was that the silicon mold typically had many imperfections such as bubbles that needed to be fixed by hand. This process took a considerable period of time. Also, the mold had to be shipped to contract manufacturers in Asia that build the replica guns, which took additional time.

Click here to read entire article

NVision HandHeld Scanner Helps Increase Life of Hydraulic Fracturing Tools

A major manufacturer of hydraulic fracturing tools for the oil and gas industry is using NVision’s HandHeld laser scanner to increase the performance and life of its products by gaining a clearer picture of erosion patterns. The company previously used ultrasonic sensors to measure discrete points in a gridded pattern after erosion testing with proppant. The HandHeld Scanner provides a much clearer understanding of erosion patterns by measuring millions of points and providing a comparison of the geometry before and after testing with color deviation models showing the amount of material that has been eroded in each area of the tool. This information helps engineers gain an intuitive understanding of tool performance, which in turn helps improve design and substantially increase tool life.

Hydraulic fracturing involves pumping a fracturing fluid into a well bore at a high enough level of pressure to cause the formation to crack, enhancing the flow of oil and gas from the formation to the well. A slurry material called proppant, which commonly consists primarily of sand or ceramic material, is then injected into the fracture to prop it open, thereby increasing the flow of formation fluids. However, the proppant is highly abrasive and erodes the casing and tools. After they have eroded to a certain point, the equipment needs to be replaced, which is expensive in terms of labor and tool cost, but most important delays the completion process.

Delta Air Lines uses the MAXOS non-contact measurement system from NVision

Delta Air Lines uses the MAXOS non-contact measurement system from NVision in its contract maintenance operations to achieve the highest possible accuracy in overhauling turbine blades and vanes. The traditional method of measuring blades and vanes to determine the level of repair required and to inspect subsequent repairs involves a series of manual measurements. “We have substantially improved on the traditional approach by using the MAXOS to provide consistent and repeatable measurements on parts with complex geometries and shiny finishes,” said Cameron Leonard, Special Projects Coordinator for Delta Air Lines.


Delta’s contract maintenance operation performs work on Delta planes as well as planes owned by other airlines and leasing groups. One of the most important maintenance operations is repairing blades and vanes at the heart of jet engines. Manuals provide numbers for critical dimensions on these parts such as the chord, axial chord and root. Maintenance staff measure parts and determine whether or not they meet the specifications. If they don’t, the part is repaired by building up the geometry with a welder, then machining it back to the original specifications and measuring it again.

Click here to read the entire article

NVision MobileScan Helps Custom Gun Grip Manufacturer Improve Quality


(November 17, 2009) -- A custom gun grip manufacturer has substantially improved the quality of its products by using the MobileScan HD portable 3D laser scanning system from NVision to reverse engineer the original grips. In the past, the manufacturer used a coordinate measuring machine (CMM) to define the geometry of the mounting surface of the grips. But the CMM’s inherent accuracy limitations made it difficult to provide the desired fit and finish. The laser scanner, on the other hand, captures millions of points, making it possible to define the mounting surface to a much higher level of accuracy.

Custom gun grips make it possible for individuals to select the configuration that provides the best handling, pointing and recoil qualities. Custom grips also add a finishing touch that improves the appearance of a gun. Most custom grips are made from woods. Personalized touches, such as monograms or initials, can also be added to the grips.

One of the most important requirements in designing custom grips is defining the geometry of the back side of the grip. It would have been a very difficult and error-prone task to create this geometry by taking manual measurements of either the gun frame or the original grips. For these reasons, the gun grip manufacturer used a CMM to capture points one at a time from the original grip. But with a CMM it was only possible to capture a rough outline of the geometry. A considerable amount of work was required to fine-tune the design and accuracy was well below what was desired.

The grip manufacturer decided to investigate laser scanning and looked at several different scanners. The company selected the MobileScan HD 3D laser scanning system, which provides very high resolution with a point spacing of 0.001” and an accuracy of +/- 0.0005” while collecting measurements at a rate of 30,000 points per second. “The High Definition version of the MobileScan 3D provides a higher accuracy inspection and reverse engineering system than was available in the past,” said Steve Kersen, President of NVision. “Customers no longer need to choose between the speed of a scanner and the accuracy of a CMM.”

The scanner generates a point cloud consisting of the coordinates of individual points. The gun grip manufacturer uses software that comes with the scanner to convert the point cloud to a polygon mesh. Then they use reverse engineering software to convert the polygon data to a surface model. They export the surface model in the IGES or STEP format and import it into their CAD software. The model is then fine-tuned and toolpaths are created for machining.

“This gun grip manufacturer has been able to achieve a competitive advantage by producing grips that fit better and look better,” Kersen concluded. “Many other companies involved in the gun business have also discovered the advantages of laser scanning. For example, Soft Air USA®, Inc has reduced by 4 to 6 weeks the time required to get its licensed replica airsoft guns to market by using NVision’s Engineering Service Division to reverse engineer the real guns.”

For more information, contact NVision, Inc., 440 Wrangler Dr, Suite 200, Coppell, TX 75019. Ph: 972.393.8000, Fax: 972.393.8002. E-mail: sales@nvision3d.com. Visit NVision's Web site at www.nvision3d.com.


About NVision
NVision, Inc. (www.nvision3d.com) was established in 1990 with one goal in mind: to provide customers with the highest accuracy non-contact optical measurement systems and services for Reverse Engineering and Inspection. Focusing our expertise on the aerospace, power generation, and oil/gas industries, NVision provides both contract scanning services and systems sales to companies throughout North America. Our elite team of engineers provides customers with an unmatchable level of experience and is able to advise and assist with the most difficult engineering challenges.

NVision’s clients include industry leaders such as Alstom, Boeing, GE, Lockheed, Lear, NASA, Porsche, Raytheon, Siemens, Toyota, and every branch of the U.S. military.


NVision Scanner Ensures Accuracy of Crash Dummies Used to Check Rollover Performance


(August 6, 2009) -- First Technology Safety Systems, Inc. (FTSS) uses the NVision HandHeld laser scanner to ensure the accuracy of crash dummies, which are crucial in evaluating the performance of side curtain airbags in a rollover. FTSS is the world's leading provider of crash test dummies and computer crash simulation models for automotive, military and aerospace applications.

The need for scanning arose when a mathematical formula was developed to define the geometry of a dummy, which, like many others, was originally based on a physical mold. “Crash dummies have been developed over the years largely as physical molds,” said FTSS Engineer Steve Goldner. “The geometry of the dummy has a major impact on crash test results but it has become essential to convert the original designs to mathematical models in order to enable improvements in manufacturing technology. It also helps avoid damage to the original mold.”

FTSS engineers designed a new dummy based on the mathematical model. Since physical measurement methods could not provide the level of accuracy needed to confirm that the new design matched dummies built from the original mold, they used laser scanning to measure the new dummy. FTSS selected the NVision HandHeld scanner for this task because of its wide-stripe laser, speed, accuracy, and ease of use. The scan data is quickly converted to an STL file, which can be easily compared to a computer aided design (CAD) model.

A key advantage of the HandHeld Scanner is that it is mounted on a mechanical arm so it can move freely around parts of any size. The mechanical arm keeps track of the scanner’s location so all data is collected within the same coordinate system. As FTSS technicians scanned the dummy, the scanner generated a point cloud consisting of the coordinates of individual points. FTSS technicians used integrated software that comes with the scanner to convert the point cloud to an STL polygon mesh. Reverse engineering software then converted the STL data to a surface model. Then they overlaid both the scanned model and the CAD geometry based on the mathematical formula to see how closely they matched.

They used this process to fine-tune the mathematical formulae until they were able to create a new dummy and confirm it exactly reproduced the original mold designs. To date, FTSS has reverse-engineered between 30 and 40 dummies with the NVision HandHeld scanner. This process ensures that current test dummies are consistent with those used in the past, which in turn ensures the accuracy of the crash tests that are used to evaluate automobile safety.

For more information, contact NVision, Inc., 440 Wrangler Dr., Suite 200, Coppell TX 75019. Ph: 972.393.8000, Fax: 972.393.8002. E-mail: sales@nvision3d.com. Visit NVision's Web site at www.nvision3d.com.

Toshiba GE Turbine Components Purchases Second MAXOS Measurement System


NVision, Inc. is pleased to announce the purchase of a second MAXOS non-contact measurement system by Toshiba GE Turbine Components (TGTC). In 2008, TGTC purchased its first MAXOS, which helped the company reduce the time needed to inspect and measure turbine blades by 83%, from 280 minutes to 45 minutes. "The MAXOS provides the best possible accuracy, eliminates the need for matt coating, and easily integrates with our engineering and production processes," said Tomio Kubota, President of TGTC. "It is also significantly faster than any of the other systems we had originally considered."

TGTC is a joint venture that combines the cutting-edge production expertise of Toshiba and General Electric to produce large blades ranging from 26 to 52 inches (660 to 1320 mm) for steam turbines. The company's annual production of blades is sufficient to generate the equivalent of eight to ten gigawatts of electricity. TGTC is sited within Toshiba's Works in Yokohama, Japan and produces long blades. A turbine bucket is comprised of an airfoil and a root. The long blades built at Yokohama have mid-span geometry that provides support for the midsection of the airfoil. The complex geometry of these blades means that many cross-sections must be examined.

TGTC previously used a coordinate measuring machine (CMM) to inspect the blades but found that it was too slow and often unable to access hard-to-reach areas such as dovetail hooks and fillets. As a result, it typically took longer to inspect the blades than to make them.

The MAXOS uses a proprietary non-contact probe consisting of a concentrated light that collects individual points at a rate of 100 per second, many times faster than a CMM. Unlike laser or white light fringe scanners, the MAXOS can inspect turbine blades without having to apply a matt coating that introduces dimensional inaccuracy. The MAXOS uses five axes to reach every point on the blades and also generates specific and accurate measurements of critical areas. Resulting measurements are reported instantly and the need for additional manual inspection is eliminated.

The MAXOS provides accuracy of +/- 0.0004" and a resolution between measured points down to 0.0002" on this project. The system can be provided with a resolution as low as 0.0001". The MAXOS software is configured with an overall best fit of the measured geometry to allow a part with some error to fit within the overall tolerance envelope of the reference data. Win3DS Blade inspection software is configured to give fast results and different kinds of evaluations on mid-span, fillets, gaps and airfoils. Different best-fits are available, including Gauss and Chebyshev.

TGTC is extremely happy with the results delivered by the MAXOS and are in the process of implementing the system at their other facilities around the world.

For more information, visit www.nvision3d.com.

SOURCE: NVision, Inc.