Showing posts with label cmm training. Show all posts

Using the Virtual Probe Method


When calibrating a stylus tip in Calypso software it is recommended that you use Dynamic Tensor calibration at least in the initial calibration. This allows Calypso to gather the “bend data” of each individual stylus. Tensor or Geometric calibration may be used for recalibration purposes.


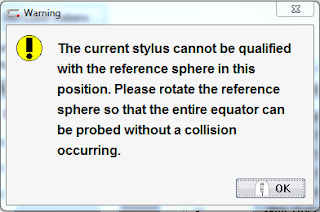
When using Dynamic Tensor calibration is not uncommon to receive this type of error.


This error requires you to rotate the reference sphere so that Calypso can access an unobstructed path around the reference sphere. To resolve this you may have reloaded the master probe and re-reference the sphere location. Then reloaded the stylus system and went through the entire calibration process.


Next time, try this procedure.


Creating a Set of Virtual Reference Spheres


Within the Stylus System Qualification dialog box click on the Reference Sphere Management icon.


This will open the Reference Sphere Management dialog. It is here that you will create the Virtual Reference Sphere positions. You may create as many positions as you would like. Below in Table 1 are listed the most used positions and these rotations might be a good start.


Above is your default Reference Sphere position screen. We will now add the Virtual Reference Sphere positions. To begin, click on the Copy as Virtual Reference Sphere button. This will bring up this next prompt.


Calypso will automatically select the next number for the reference sphere. Leave the number as is and click ok.

 
Now another reference sphere is added.


Change the Rotation Angle, in this case to 135 degrees, and Click Apply.


Let’s add another position. Click back on number 1 in the list and repeat the steps. Click on the Copy as Virtual Reference Sphere button. Name this one #3 and click ok. Highlight #3 in the list and change the rotation angle to 225.00 degrees and click Apply.


Repeat the steps until all of the positions are created.

Note: Inclination will be 135 on all examples
Ref Sphere Position           Rotation

1                                           45 
2                                          135
3                                          225
4                                          315
5                                          0
6                                          90
7                                          180
8                                          270


Remember all these steps where done to circumvent this error during calibration. Once you have completed the above steps it is not necessary to do them again. They will be stored for future use.


Using a Virtual Reference Sphere Position during calibration
The stylus will do a tensor calibration before this error appears.
Once this error has occurred change the Mode to Dyn. Tensor Re-qualification Mode.


Rotate the Master Sphere on the CMM table to the desired position that will allow for a dynamic calibration. It is important to just rotate around the existing position on the table. Do move it to some other location just rotate it around where it is currently located.


Open the Reference Sphere Management dialog


Now select the corresponding Virtual Reference Sphere that matches the new position on the table


Click Activate. This will now make, in this example, #3 active


You can now see that the Reference Sphere is Sphere #3


Now click on the Qualify Stylus button.


You are prompted to move the stylus and touch the stylus in the direction of the shaft.

 
This will now begin the dynamic tensor calibration. This is the scanning of the master ball since the tensor calibration portion was already completed prior to the error


The calibration is complete. Notice the Dynamic Qualification check mark is present and the Mode has changed back to Dynamic Tensor.


NOTE: By using the virtual sphere procedure, you first measure all styli in one position of the reference sphere and only then rotate the sphere to carry out the dynamic stylus qualification. Otherwise, you would have to re-qualify the sphere each time again.


New CMM Training forum

Come join us on our CMM Training forum.


Click here to register


It's free to join. We have videos and downloadable .pdf handouts.

Free CMM Training

Join us at Mark Boucher Consulting, A CMM Quarterly company, forum


It's free to join


Click here to Register


The American National Standards Institute (ANSI) Approves New Quality Information Framework (QIF) v 2.0 Standard


New QIF™ V2.0 Standard:  A Major Breakthrough for Manufacturing Quality
Provides Complete & Accurate MBD along with many other enhancements for the Metrology Industry


Burleson, Texas, USA November 23, 2014 — The (DMSC, Inc.) Dimensional Metrology Standards Consortium announced today the American National Standards Institute (ANSI) has approved QIF v 2.0 (Quality Information Framework, version 2.0) as an American National Standard.  This new standard enhances the previous ANSI Standard, QIF V1.0 containing quality planning and measurement results, by providing a complete and accurate 3D product definition with semantic geometric and dimensional tolerances, definitions for measurement resources, template for measurement rules, and statistical functionality.  All of this to satisfy the digital interoperability needs for a wide variety of use cases including feature-based dimensional metrology, quality measurement planning, first article inspection, and discrete quality measurement.

On December 19th, 2013, The ANSI Board of Standards Review (BSR) approved QIF v1.0 as an American National Standard. This new standard provides, quality measurement planning (QIF Plans), first article inspection (QIF Results), and discrete quality measurement.  

QIF v2.0 resolves model-based metrologies primary “pain point,” which is obtaining a complete and accurate 3D product definition with semantic geometric and dimensional tolerances (QIF MBD). It provides cost effective XML exchange of product definition with various conformance levels of semantic PMI (e.g., GD&T) that satisfies many CAD to model-based metrology use cases.  QIF v2.0 also provides a way to define and apply measurement resources (QIF Resources), measurement rules (QIF Rules), and statistics (QIF Statistics) towards generating and communicating feature-based measurement plans based upon a plant, department, or supplier’s measurement resources and rules defined by a company and/or by part type.  QIF models include quality characteristics and measurement features as defined in the ASME Y14.5 specification and the Dimensional Measuring Interface Standard (DMIS).

ANSI approval of QIF v2.0 indicates that QIF has attained a consensus approval from a large number of subject matter experts in the digital metrology industry.  (See “About DMSC” below.) The QIF standard was designed to meet the highest industry requirements and to satisfy technological gaps that have traditionally cost industry hundreds of millions of dollars annually. The DMSC has met, and continues to meet the need for urgently required national standards in quality measurement in a timely fashion.   ANSI’s accredited Standards Developing Organizations (SDOs) operate in accordance with national and often international guidelines, and have been verified by government and peer review assessments. 
To find more information about the QIF standards please visit the QIF website at www.qifstandards.org.  To obtain your no-cost copy of the standard please send a request via email to bsquier@dmis.org.

"I am proud of our standards community and the work that we have accomplished with this new standard. This doesn’t replace DMIS (Dimensional Measurement Interface Standard) but it compliments and can harmonize with it. This new standard infrastructure is expandable to include every aspect of the Quality Information Framework, thus the name. Once adopted by the software vendors, this will allow us to properly use digital models with all the engineering requirements and quickly produce inspection and measurement plans throughout our supply chain (micro and macro), conduct inspections and measurements, then analyze and report in standard formats via AS9102 or PPAP files. This will be a huge savings throughout every manufacturing industry in our environment without any cost to the software vendor or user." said Ray Admire, DMSC Treasurer and Chairman of the Quality Measurement Standards Committee."

Manufacturing quality digital information incompatibilities are costly and affects everyone: vendors, suppliers, users, and customers.  And the digital metrology community has lacked an enterprise-wide standards solutions, UNTIL NOW, QIFv2.0, a superior standards-based digital interoperability has been ANSI approved.  Furthermore the QIF enables Manufacturing Quality to join the Model-Based Enterprise next generation of doing business.” said DMSC President Curtis Brown.


About DMSC
The Dimensional Metrology Standards Consortium (DMSC, Inc.), is an ANSI Accredited Standards Developing Organization, as well as an A-Liaison to ISO TC 184/SC1.  QIF has been developed and demonstrated with support from: Applied Automation Technologies, Boeing, Capvidia, DISCUS, Hexagon Metrology, Honeywell FM&T, InfinityQS, Innovalia Metrology , Inspec Software Corporation, IPI Solutions, John Deere, Kotem, Lockheed Martin, Metrology Integrators, Metrosage, Mitutoyo America, National Institute of Standards and Technology (NIST), Nikon Metrology, Origin International, PAS Technology, Pratt Whitney, PTC Solutions, Quality Vision International, Renishaw, Rolls Royce, Siemens PLM Software, Systems Insights, and Zeiss. 

These are many of the same experts who continue to maintain the Dimensional Measuring Interface Standard (DMIS).


QIF is a registered trademark of the DMSC.   © 2014 Dimensional Metrology Standards Consortium

CMM Manager 3-2-1 Alignment

This video is part of the CMM Manager video training series offered at CMM Quarterly Publications. This video demonstrates not only how to create a 3-2-1 Alignment but also what is happening with the degrees of freedom.


Inspection Manager Now Supporting Automated Drawing Revision Control

HIGH QA, a leading developer of 2D automated ballooning and GD&T solutions, announces the release of version 3.8 of its revolutionary Inspection Manager software featuring an automated Revision Control module.


The Revision Control module helps users avoid hours of redundant work when the quality control department receives a new revision of a drawing.

The software facilitates a smooth transition from the current drawing revision while keeping intact all balloons, dimensions, and data that have not changed from the previous version.  Revision Control Wizard guides users though the drawing update process, clearly marks the differences between the old and new drawings, and helps make new revision balloon adjustments. Newly added dimensions can be automatically ballooned in just one click.    

Adding the Revision Control to Inspection Manager's powerful automation capabilities, supplements a set of modules that include: automated ballooning and GD&T extraction, generation of an inspection plan, and creation of inspection reports, such as FAI, PPAP, and more.  


"Our main objective is to streamline the inspection process, eliminate bottlenecks, and automate processes that traditionally have been done manually," said Sam Golan High QA Founder and Chairman. "We keep an open line of communication with our clients to receive their feedback on our products, listen to their needs and challenges, and develop solutions that target their goals. Revision Control was 'born' to help our clients keep track of changes and revisions to the original blueprint with a few clicks of a button."

As part of High QA's commitment to a high level of customer service, its loyal customers will receive the Revision Control module at no additional charge.

Adopted by clients in the aerospace, automotive, medical, and manufacturing industries, Inspection Manager has already been proven to improve efficiency, productivity, and profitability.

To learn more about Inspection Manager, join us for a free web seminar.
Please contact Shimon Azulay This email address is being protected from spambots. You need JavaScript enabled to view it.">shimon@highqa.com with any questions or to request a private demo.

Next Generation Laser Trackers Increase Portability and Ease of Use

Hexagon Metrology launches a new range of all-in-one high-speed laser trackers 
Leading metrology solutions developer Hexagon Metrology today unveiled the Leica Absolute Tracker AT960, a walk-around coordinate measuring machine that fits in a single flight case. The latest model in the Leica Absolute Tracker range, the AT960 answers customer demand for a genuinely portable laser tracker with high-speed dynamics and six degrees of freedom (6DoF) capabilities.
To view the video, visit http://hexmet.us/AT960/pr
With a complete range of Leica laser tracker accessories built into the device, the AT960 measures to a Leica T-Probe, Leica T-Scan or reflector straight out of the box. Hot-swap battery function and IP54 certification for use in even the toughest workshop conditions mean the AT960 really can be taken anywhere. 

Also launched today is the Leica Absolute Tracker AT930 system. With all the features and functionality of the AT960 without the 6DoF compatibility, the AT930 offers a totally transportable 3D solution with unprecedented dynamic capabilities and real-time operation.

“The new AT960 and AT930 laser trackers feature the latest electronics and optical technologies. Leveraging the recent developments of PowerLock, absolute interferometry and optical miniaturization we are able to release next generation portable products based on proven features,” explains Duncan Redgewell, General Manager, Leica metrology products. “The AT960 and AT930 replace the hugely-successful AT901 and T-Cam products and complement the basic Leica Absolute Tracker AT402. We now offer the most complete and modern range of laser trackers available on the market, giving our customers the opportunity to choose the right equipment for their specific needs.” 

The Leica Absolute Tracker AT960 and the Leica Absolute Tracker AT930 are available to order immediately through your local Hexagon Metrology commercial center or distribution partner. The Leica Absolute Tracker AT960 will be shown at HxGN LIVE Local at Hexagon Metrology’s Lake Forest Solution Center (Lake Forest, CA) Wednesday, November 12, from 9:00 a.m. to 4:00 p.m.

About Hexagon Metrology
Hexagon Metrology offers a comprehensive range of products and services for all industrial metrology applications in sectors such as automotive, aerospace, energy and medical. We support our customers with actionable measurement information along the complete life cycle of a product – from development and design to production, assembly and final inspection. 


With more than 20 production facilities and 70 Precision Centers for service and demonstrations, and a network of over 100 distribution partners on five continents, we empower our customers to fully control their manufacturing processes, enhancing the quality of products and increasing efficiency in manufacturing plants around the world. For more information, visit www.hexagonmetrology.com

The CMM Handbook Version 6

CMM Quarterly Publications announces the newest version of The CMM Handbook. This version, version 6, has added an expanded GD&T section, a complete section on Profile, and more in-depth articles on CMM methodology.


Now take your CMM knowledge to a higher level with The CMM Handbook and accompanying videos. With expanded explanations and examples, this book will add to your knowledge of how the CMM is calculating your measured results. 

This book is not a training manual on a specific software but an educational resource.


Coordinate Metrology Society Launches Level-One Certification Program for Portable 3D Metrology


First Examinations to be held at 2013 Coordinate Metrology Systems Conference 
San Diego, CA – April 22, 2013 – The Coordinate Metrology Society (CMS), the eminent membership association for measurement professionals, today announced the launch of the industry’s first Level-One Certification for Portable 3D Metrology.
The first examinations will be held at the 29th annual Coordinate Metrology Systems Conference (CMSC), July 22 – 26, 2013, at the Sheraton San Diego Hotel and Marina. Applicants for the Level-One Certification must submit an application, meet eligibility requirements, sign the CMS code of ethics, and pass a peer review. Qualifying candidates will be notified and scheduled for an examination seat at CMSC 2013. The cost for a CMS member to take the Certification exam is $400, non-member pricing is also available. Certification program guidelines and application forms are available on the CMS website at https://www.cmsc.org/cms-certification. 
The CMS Certification credential aids in quantifying an employee’s knowledge of metrology, which is essential to ISO certified manufacturers and companies with Quality Management Systems. The Certification exam is currently comprised of two assessments. The Level-One examination is a proctored, online assessment consisting of about 200 multiple choice questions covering foundational theory and practice common to most portable 3D Metrology devices. The Level-Two exam on a portable CMM (coordinate measuring machine) is being piloted at the 2013 CMSC. This is a practical performance assessment. The candidate must use a metrology instrument to collect a series of measurements on an artifact, then analyze specific features of that artifact.  
“Portable 3D Metrology is being integrated into manufacturing processes at a rapid rate,” states Randy Gruver, chair of the CMS Certification Committee. “The Coordinate Metrology Society determined a clear need for a Certification program based on a graying workforce and the increasing need for metrology expertise. Data collection technologies that were once the domain of scientists, engineers and mathematicians, are now being used by technicians and shop-floor personnel for industrial applications and beyond. The measurement equipment is calibrated and certified to performance standards, but the personnel operating this equipment are not accredited. There are many variables induced by an operator that can dramatically influence data collection. It is important for an employer to understand the knowledge level of an employee or a metrology service provider in this industry.”          
About the Coordinate Metrology Society 
The Coordinate Metrology Society is comprised of users, service providers, and OEM manufacturers of close-tolerance industrial coordinate measurement systems, software, and peripherals. The metrology systems represented at the annual Coordinate Metrology Systems Conference (CMSC), include articulated arm CMMs, laser trackers, laser radar, photogrammetry/videogrammetry systems, scanners, indoor GPS and laser projection systems. The Coordinate Metrology Society gathers each year to gain knowledge of the advancements and applications of any measurement system or software solution that produces and uses 3D coordinate data. For more information on this organization, visit their web site at http://www.cmsc.org
About the Coordinate Metrology Systems Conference 
The Coordinate Metrology Systems Conference (CMSC) is the world's premier event for Measurement Technology Professionals. This annual event is sponsored by the Coordinate Metrology Society. Established in 1984, the five-day conference is held each year at a different location, and attracts visitors from around the globe. CMSC is acclaimed for its comprehensive program of top-shelf white papers and applications presentations given by industry experts from science/research laboratories and manufacturing industries such as aerospace, space hardware, antenna, automotive, shipbuilding, power generation, and general engineering. No other trade show rivals the high level of authoritative information provided by CMSC members and master users of portable metrology instruments, software, and peripheral equipment for quality control, quality production, and precision assembly.